
What is Solenoid Valve?
If you’ve ever worked with solenoid valves, you know how important they are in various industries. But like any mechanical device, they can run into problems that affect their performance. To keep operations running smoothly and avoid costly downtime, it’s essential to understand these issues and know how to fix them. In this guide, we’ll walk you through common solenoid valve problems and offer practical solutions to resolve them. By following this troubleshooting guide, you’ll be able to maintain your solenoid valves in top condition and ensure an uninterrupted workflow.
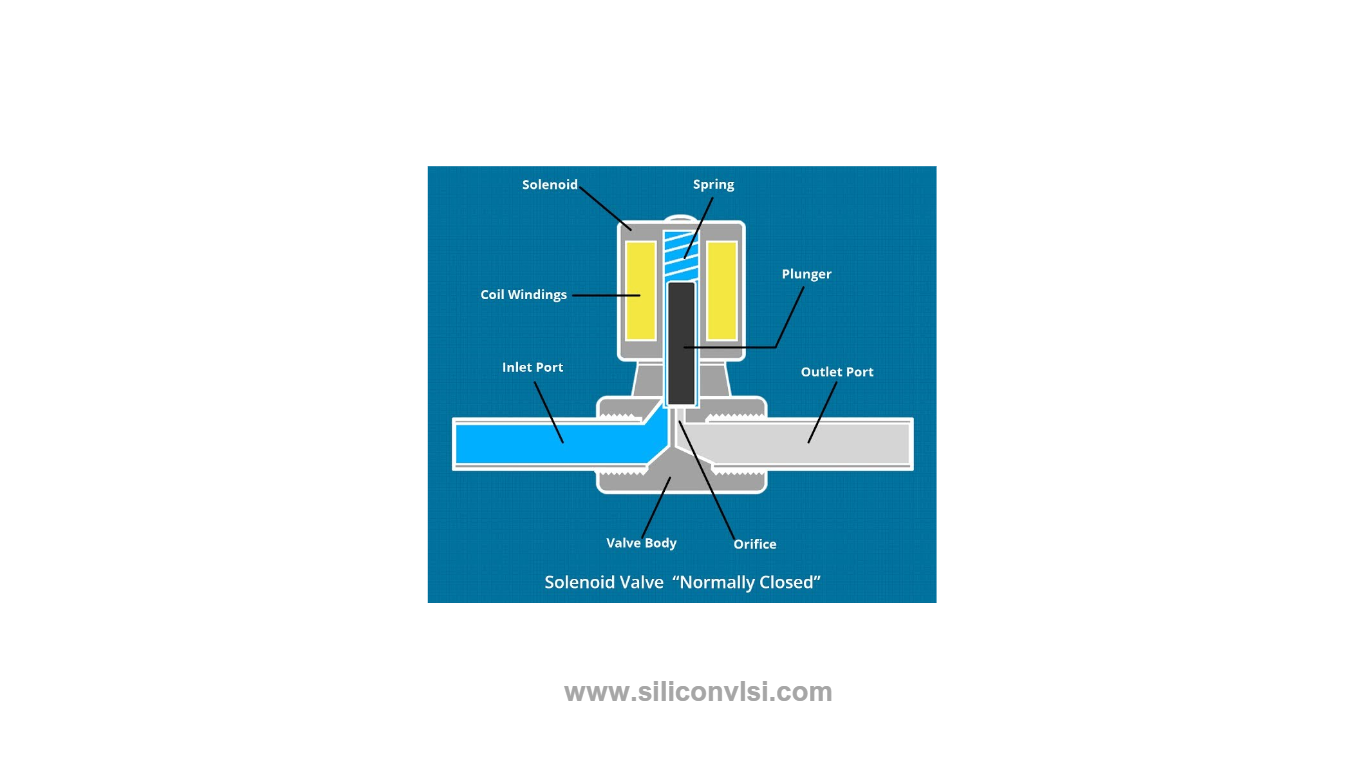
What is a Solenoid Valve
Problem: Solenoid Valve Does Not Open
Possible Cause: No power supply on the solenoid valve coil
Solution:
- Check the supply at the solenoid valve terminals.
- If the supply is okay, verify whether the valve is in open or closed condition.
- Lift the coil slightly to check its magnetic force but avoid completely removing the coil when the supply is available to prevent burnout.
- If the coil does not receive the supply, check relay contacts, wire connections, and fuses.
- Ensure the coil voltage and frequency align with the rated electrical parameters, allowing for a variation of +/- 10% in voltage and +/- 5% in combined supply and voltage variation.
- Measure the voltage and frequency using a multimeter and adjust the supply system if necessary.
- Verify if the differential pressure is within the specified limit mentioned in the control valve manual.
- Reduce the differential pressure by decreasing the inlet pressure if it is too high.
- Check the valve specifications in the manual to determine the required differential pressure and increase the inlet pressure or replace the coil accordingly.
- If the tube is bent, it is advisable to replace the valve.
- Clean the diaphragm thoroughly to remove any impurities and replace defective components if necessary.
- Remove dirt from the armature or tube, as it can restrict plunger movement. If needed, replace defective components.
- Clean corroded parts or replace them to address corrosion-related issues.
- Fit new components in the valve if any are missing after valve removal.
Problem: The Solenoid Valve Only Partially Opens
Possible Cause: Differential pressure too low
Solution:
- Check the specifications of the coil for the valve and consider replacing the coil if necessary.
- Replace the valve if the tube is bent.
- Clean the diaphragm to eliminate impurities and replace any defective components.
- Clean the valve and replace defective parts if necessary.
- Clean the tube to remove dirt and replace any defective parts.
- Address corrosion-related issues by cleaning the valve or replacing defective parts.
Problem: The Solenoid Valve Is Too Noisy
Possible Cause: Humming
Solution:
- Check for problems in the supply voltage and replace the coil if required.
- Reduce hydraulic shocks during valve opening/closing by installing a pressure-reducing valve in front of the solenoid valve.
- If possible, increase the tube diameter to minimize hydraulic shock.
- Install a flexible hose pipe to further reduce hydraulic shock.
- Verify the valve information, especially regarding differential pressure and pulsation in the pressure line.
- Check the fluid pressure and flow data and consider replacing the valve with a more suitable type.
- Inspect other installation components for any issues that may contribute to noise.
Problem: Solenoid Valve Does Not Close or Closes Partially
Possible Cause: Voltage remains on the coil
Solution:
- Lift the coil slightly to check if it resists, and ensure proper wire connections and relay contacts.
- Clean the orifice/leveling nozzle using a needle with a maximum diameter of 0.5 mm and blow out the hole with compressed air.
- Replace defective components if required.
- Check if the manual opening unit is screwed back after use and adjust its position accordingly.
- Verify the valve data, fluid pressure, and flow to address pulsation in the pressure pipe.
- Replace the valve if the armature tube is bent.
- Check and replace any defective components such as the valve spring, diaphragm, or valve plunger.
- Ensure the diaphragm is correctly mounted and adjust the valve position if necessary.
- Clean the valve and replace any defective parts.
- Replace defective components if corrosion is present in the orifice.
- Check the direction of fluid flow and make sure the arrow on the valve is pointing in the same direction.
Problem: Burned-Out Coil – No Voltage at Coil Terminals
Possible Cause: Incorrect voltage/frequency
Solution:
- Check the coil data and replace it with the correct type if necessary.
- Verify the wiring according to the wiring diagram and check for maximum voltage deviations. For dual frequency, DC applications, the voltage tolerances should be +/- 10%, while for AC, single frequency voltage, it should be +10% or -15%.
- Inspect other components for possible short circuits and ensure proper wire connection to the coil.
- Replace the coil if it is faulty, and consider using a snap-on coil with an additional O-ring body seal for better sealing.
- Check the medium temperature and ensure it aligns with the valve and coil data for installation parameters. Replace the coil or valve with a suitable type if needed.
- If the temperature around the valve is too high, consider moving it to a cooler place, increasing ventilation, and ensuring proper alignment with installation parameters.
Conclusion
By addressing common solenoid valve problems promptly and employing the appropriate solutions outlined in this guide, you can ensure the efficient functioning of your valves and maintain uninterrupted operations. Remember to regularly inspect and maintain your solenoid valves to prevent issues and extend their lifespan. Following best practices and adhering to manufacturer guidelines will help optimize your solenoid valve performance and minimize downtime, leading to increased productivity and cost savings.