Definition of Screw Gauge
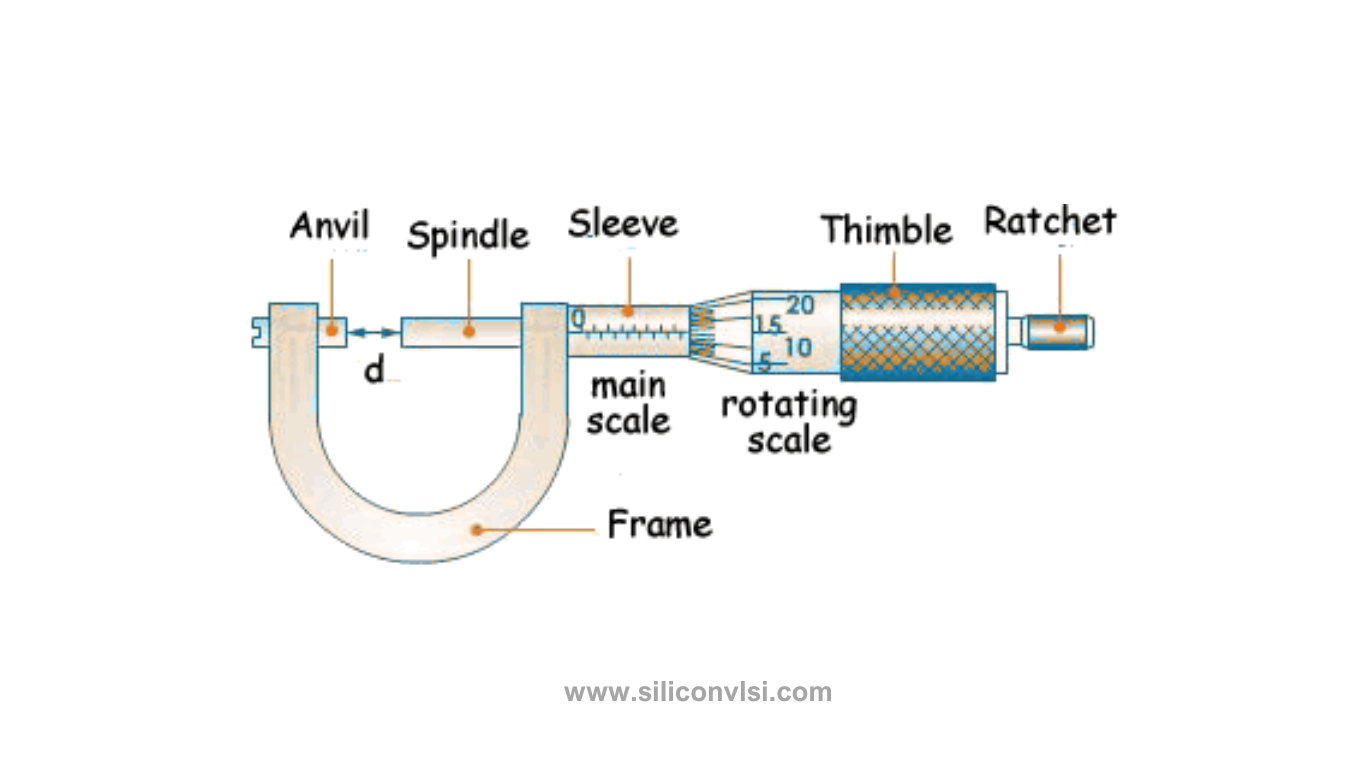
A screw gauge, also known as a micrometer screw gauge, is a precision instrument used for measuring dimensions with great accuracy. It consists of a U-shaped frame with a screw mechanism, a thimble, and a spindle. The screw mechanism allows for precise and controlled movement of the spindle.

Parts of Screw Gauge
- Frame: The U-shaped frame provides stability and support to the screw gauge.
- Thimble: The thimble is the outermost part of the screw gauge and contains a circular scale for measurements.
- Sleeve: The sleeve holds the thimble and allows it to rotate smoothly.
- Spindle: The spindle is attached to the screw mechanism and moves along its axis.
- Anvil: The anvil is the fixed end of the screw gauge against which the object being measured is placed.
- Spindle Lock: The spindle lock is used to secure the spindle in place once the measurement is taken.
How Screw Gauge Works
When the thimble is rotated, it causes the spindle to move along the screw mechanism. This movement is highly precise and allows for accurate measurements. The circular scale on the thimble is marked in divisions, typically representing a distance of 0.01 mm. The main scale on the frame further aids in measuring larger dimensions.
Types of Screw Gauges
- External Screw Gauge: Used to measure the external dimensions of objects such as rods and cylinders.
- Internal Screw Gauge: Designed to measure the internal dimensions of objects like holes and bores.
- Depth Screw Gauge: Specifically used to measure the depth of holes or the height of steps.
Advantages of Screw Gauge
- High Precision: Screw gauges provide precise measurements with accuracy up to 0.01 mm.
- Versatility: They can measure both internal and external dimensions, making them versatile instruments.
- Ease of Use: Screw gauges are user-friendly and provide straightforward measurements.
- Repeatable Results: Measurements obtained with a screw gauge can be easily reproduced.
- Durability: Well-maintained screw gauges can provide long-lasting service.
How to Use a Screw Gauge
- Place the object to be measured between the anvil and the spindle.
- Close the spindle gently until it touches the object.
- Rotate the thimble to move the spindle and apply slight pressure.
- Read the measurement by aligning the main scale and the circular scale on the thimble.
- Take multiple measurements to ensure accuracy.

Zero Errors
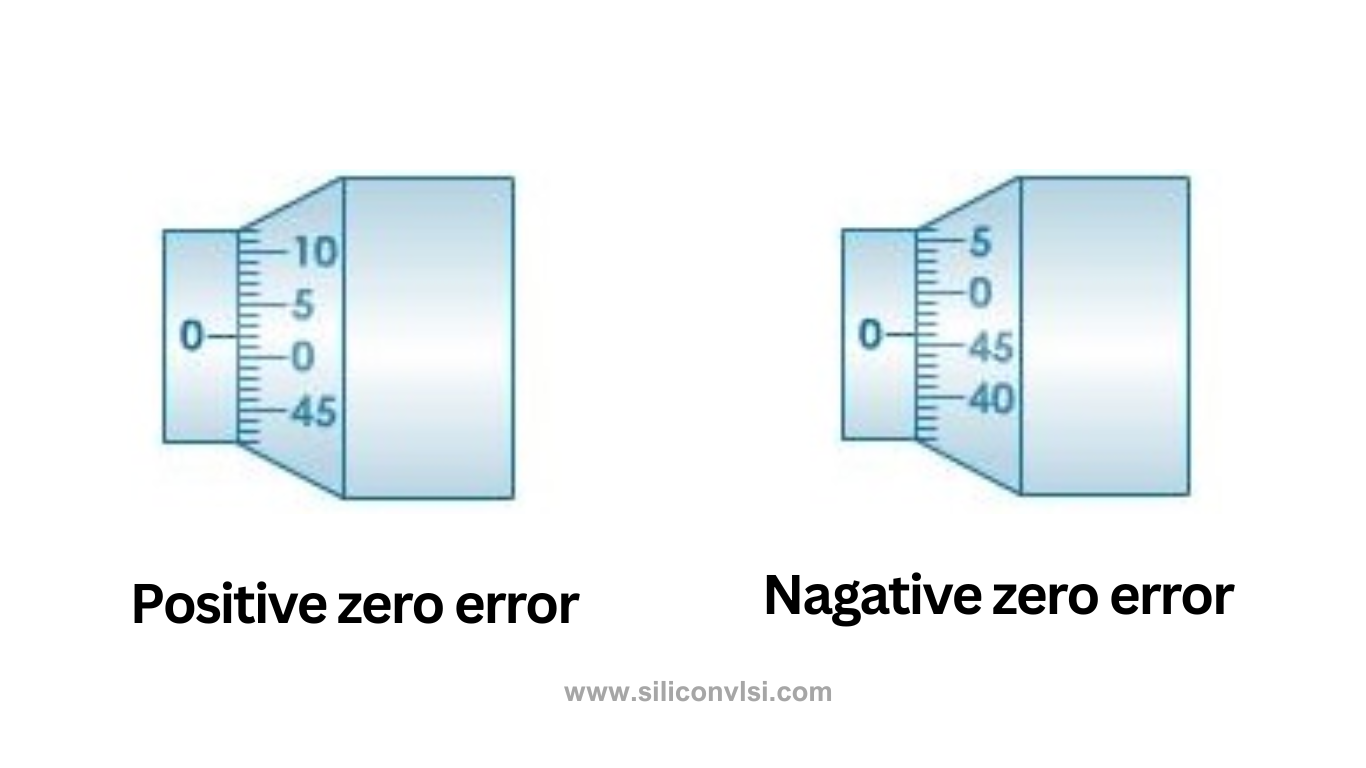
Zero errors occur when the zero mark on the circular scale does not align with the zero on the main scale when the anvil and spindle are brought together. There are two types of zero errors: positive zero error and negative zero error.
Positive Zero Error
Positive zero error is encountered when the zero mark on the circular scale is below the main scale line. To determine the positive zero error, follow these steps:
- Note the division on the circular scale that coincides with the main scale line.
- Calculate the positive error by multiplying the number of divisions on the circular scale matching the main scale line by the least count of the micrometer screw gauge.
- To obtain the correct reading, subtract the positive error from the overall measurement.
Negative Zero Error
A negative zero error occurs when the zero mark on the circular scale is above the main scale line. To find the negative zero error, perform the following steps:
- Identify the division on the circular scale that coincides with the main scale line.
- Determine the negative error by multiplying the number of divisions on the circular scale matching the main scale line by the least count of the micrometer screw gauge.
- To obtain an accurate reading, add the negative error to the overall measurement.
Back-lash Error
The back-lash error occurs when the tip of the screw does not move backward during a part of a rotation in the reverse direction. This error is typically caused by wear and tear of the threads. To avoid back-lash error, it is recommended not to rotate the head of the screw gauge in the reverse direction once the object being measured is held between the anvil and the spindle. By maintaining a consistent rotational direction, you can minimize or eliminate back-lash errors.
It is important to be aware of these errors and take appropriate measures to mitigate them during measurements. Regular calibration and maintenance of the screw gauge can help identify and rectify zero errors. Additionally, practicing proper handling techniques and avoiding reverse rotation can prevent back-lash errors, ensuring accurate and reliable measurements.
Remember to consult the manufacturer’s instructions and guidelines specific to your screw gauge model for troubleshooting and correcting any errors encountered during measurement operations.